Saturday, September 17, 2011

Plenty of Fish in the Freezer-Making Halibut Ceviche

We have several pounds of fish in our freezer from the fishing trip my fiance went on when he was visiting Alaska. I'm determined to use it up before we end up with more-ack! To that end, last night we made a halibut ceviche. It's basically my own recipe made from cobbling together several recipes I found online.
For those of you not familiar, ceviche is a fish dish found in South American cuisine. I personally had it for the first time in Peru. Ceviche is not cooked-raw fish or seafood is marinated in some kind of citrus (lemon or lime) juice, usually along with other ingredients (such as onions, chilis. For more info see: http://en.wikipedia.org/wiki/Ceviche) Obviously, as with sushi or any other raw fish dish, you need to be careful that you use very fresh fish, and there is some risk of food poisoning from raw fish. Ingredients: 1lb of Halibut - cut into 1/2 inch cubes juice from 5 lemons juice from 5 limes 4 jalapeno peppers, diced and seeded 1 sweet onion, diced 1 bell pepper (we used orange), diced 3 medium tomatoes (we used some pretty purplish ones), diced fresh parsley and cilantro-diced salt and pepper-to taste, if desired
Cube halibut and dice jalapeno peppers and mix with lemon and lime juice in a non-metallic bowl (glass or plastic will work). Cover and refrigerate for 1 1/2 hours.
Dice onion and bell pepper and add to mixture. Stir well and refrigerate for about 1/2 hour.
Dice fresh tomatoes, parsley and cilantro, salt and pepper. Add to mixture and serve.
You can serve this with corn and potatoes (which is how I saw it done in Peru), or rice, avocado, tortilla or plantain chips, or whatever you want, really! We had ours with a whole grain rice 'medley' and sweet potato tortilla chips (both from Trader Joe's!) This recipe is really a lot of fun to make-and easy apart from all the waiting. I love how it got more colorful as we went along. I tried this once before-several months ago-with a mix of halibut and salmon, but never got around to writing down what I did. I really preferred the halibut over the salmon. You could easily make this with most other white flesh fish, I think. 

 Do you guys like ceviche? Has anyone tried making it? It's really easy, just a lot of time marinating. What would you add? How would you serve it? Please leave me a comment and let me know!

Tuesday, August 2, 2011

Beading Made Portable


I've always been jealous of knitters and crocheters. Their craft seems so portable. You see them working all over the place-waiting rooms, coffee shops, trains. I've always wanted to be able to do that with my jewelry making! I've always thought it would hard to organize bringing a lot of beads, wire, and tools with me. Not to mention I wondered if I would get funny looks.

So, I set about looking for a way to carry my beading with me so I could give it a try. Here's what I came up with:


Basically, I stole two smallish boxes that my fiance had been given with some fancy tea for his birthday. They have tight fitting lids so they wouldn't fall open while traveling. One would easily fit in a large purse. I removed all the packaging from inside and just started wedging things in. I carry a beading mat in one, so I can put things out on a table without them rolling around.


When I travel, I always wrap my pliers so they don't damage anything. I turn some duct tape sticky side out and wrap it around the ends of each pair of pliers, with the pliers in an open position. Then I wrap another layer of duct tape (sticky side in) over the first layer so it doesn't stick to everything.


So far, it's working pretty well. I've used them to work while waiting for my father to have a procedure in the hospital, and on an amtrak train. I find making rings to be one of the easiest projects to carry with me. The tea tins don't fit a ring sizer or hammer, but I can carry those separately pretty easily, or leave the hammer at home. I've also got an old biscuit tin I bought at a yard sale for when I need to fit more/larger items in. The problem with that (at least the one I have) is that the lid doesn't fit tightly and needs to be rubber banded on.

I'm working on a few other ideas for ways to carry my beading projects around. I'd love to hear about your ideas. Is your craft portable? What's your favorite way to carry it with you?

Thursday, June 30, 2011

New Treasury Featuring Local Artists

Hello everyone! I just wanted to share my latest treasury with you all. I made a treasury on etsy featuring some local crafters/artists from the Cambridge/Somerville/Boston area. There is so much good stuff going on around here! Enjoy!


Don't forget to stop by my shop to see my new listings. In the last few weeks, I've added fun rings and scrabble tile pendants to my shop. And please leave a comment here to let me know what you think!

Friday, June 24, 2011

Triple Letter Score-Scrabble Tile Pendants Part 2-making bails!


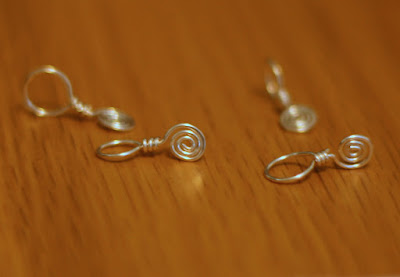
I know you’ve all been anxiously awaiting this, so here is part two of my post on scrabble tile pendants! Once the resin had cured on the scrabble tiles, the next step was to add the bails (or, pendant-hanging thingers, as I would have called them a couple of years ago before I started making jewelry-I’ve learned a lot of new terminology!) There are a lot of pre-made glue-on bails available, mostly by Aanraku. But being me, I wanted to make my own bails from wire. I had some idea as to how it might be done, and I looked around online for examples to see if anyone else was doing something similar. I didn’t find any, and I started wondering if handmade bails would even work! Luckily I asked around to a few of my jewelry-making ‘tweeps’ on Twitter, one of whom has made her own bails in the past and she reassured me so I got started!


I made the bails themselves with 22 gauge half-hard wire.  I made a small wire spiral, and made a large wrapped loop on top. (That was especially exciting as I got a chance to use my new wire looping pliers!)  I’m sorry I don’t have any pictures during this part of the process-I got excited and made a whole bunch before I remembered I wanted to blog about this!


I hammered the spirals flat figuring that that would make a more surface area for the glue to adhere to.  I also hammered the loops to harden them.


I then sanded both the wire spirals and the backs of the scrabble tiles to make a rough surface for the glue to adhere to. 


Then I was ready to glue! After doing some reading online I’ve found that a lot of people use an adhesive called e-6000. I’ve heard mixed reviews of it, though, with some people saying that their creations fall apart using this glue! My friend Meredith of TilleyJewels suggested something called Crafter’s Goop, which I think I will try out next.  My fiancĂ© has a quick-drying two-part epoxy that he’s used for wire projects, so I tried that first because we already had it. You have to mix the two parts, then use it quickly before it begins drying.


Here is what the finished product looks like, both front and back. I’m pretty happy with how it looks, and just about ready to list them in my shop. The glue (and the results of my resin spills that I mentioned in the last post) are visible, but only on the backs of the pendants. My main concern with these was sturdiness-would the handmade bails stay on? A friend of mine has been wearing one of them and has had no problems so far. On top of that, when I was trying to take pictures of the pendants, I dropped a wooden board that I use as a background right on top of them, and the bails didn’t separate from the pendants. The adhesive wasn’t even fully cured at that point, so, I think they’re going to work pretty well!

As usual, thanks for reading, everyone! Please leave me a comment and let me know how you like the pendants. Would you buy one?

I was included in a treasury: City Life!

Wow! One of my scrabble tile pendants was included in this lovely 'City Life' treasury by Shroompers on etsy! Check it out!

Sunday, June 19, 2011

Semi-homemade cooking: Unfried Rice


I came up with this recipe while I was helping out my mom who had been ill with pneumonia. She’d just come home from the hospital, and was only just starting to regain her appetite so I wanted something fairly simple I didn’t want to head to the grocery store. All we really had in the house for quick cooking was leftover rice, frozen veggies, and eggs. And so, unfried rice was born! This was really a thrown together dish, so please excuse the lack of measurements and exact quantities-do what you want, modify, and use what you have on hand! Here’s how I did it:

Ingredients:

Pre-cooked or leftover rice (probably about 3 cups)
½ a bag of frozen broccoli (obviously, substitute whatever veggies you have on hand or prefer)
2 eggs
Soy sauce
Seasoned rice vinegar (we use a brand called Nakano)
Ground mustard
Dried (or fresh) parsley


Basically-I cooked the frozen broccoli by the stovetop method-which involved putting the broccoli in a pot with a small amount of boiling water. I partially drained the cooked broccoli leaving a little water, and added the pre-cooked rice. I scrambled and cooked the egg s, and chopped them up with the spatula before adding them to the pot as well. I turned on very low heat and added the soy sauce, vinegar, and spices. I mixed everything together and cooked until heated through. That’s it!


It came out pretty tasty. Not quite the same as fried rice of course. I think I’ll make this again at home with some changes. I might add a small dash of sesame oil and maybe red pepper flakes or sriracha to make it a bit more interesting. Let me know what you think! What would you add or leave out?

Thursday, April 28, 2011

Homemade Cooking: Pasta with Beans and Greens


I’d like to share a recipe I tried out a couple of days ago. I came up with it mostly based on a few veggies that begged me to buy them at the Trader Joe’s. And I love pasta, so of course I had to include some! It’s simple but tasty, and would be really easy to modify further to fit your tastes. The veggies, whole wheat instead of regular pasta, and some beans for protein sound like a fairly balanced and healthy combo to me! As usual I forgot to take pictures before we’d eaten it all.

Ingredients:

1 bag whole wheat egg noodles
Olive oil
2 cloves garlic (minced)
½ of a red onion (diced)
1 bunch kale
1 bunch chard
1 can of white beans (drained and rinsed-I used great northern)
Red pepper flakes (to taste)
Salt (to taste)
Pepper (to taste)
Grated fresh parmesan cheese (to taste)

Directions:
Cook pasta (I suggest undercooking them by about a minute as they will cook more when combined with the other ingredients) while you prepare the rest of the meal. Put olive oil in a cast iron pot/dutch oven-just enough to coat the bottom of the pot.  Add garlic and red onion. Slice kale (without stems) and chard into pieces and add to pot. Cook until tender.  Add beans, pasta, red pepper flakes, and salt and pepper to pot. Toss together and cook until heated through (5-10 minutes).  Add grated parmesan cheese to each person’s when serving, stir and eat! Yum!

This was a really quick and easy recipe to make. You could probably use any kind of greens (spinach would probably be tasty!)  You could omit the red pepper flakes if you don’t like spice. It would probably also be tasty with zucchini, bell peppers, or just about any other veggies that are good cooked.  You could probably also omit the olive oil, although I think it makes the spices and garlic/onion flavor stick to the pasta and veggies. Even though it’s a fairly healthy oil it should be used sparingly, of course, as a little bit of oil adds a lot of calories. Enjoy!

Copyright 2011. See more at Voyage of the Hyperspace Hippo

Tuesday, April 12, 2011

Triple Word Score-Scrabble Tile Pendants

Hello readers! For the past few days I've been working on scrabble tile pendants. This is the first time I've tried working with resin and I'm having so much fun! I thought it'd be even more fun to share the process with you guys. I bought some individual scrabble tiles at a flea market (the Fremont Sunday Market) while I was visiting Seattle. I also got some other cool stuff while I was there-watch backs, old coins-but those will have to wait for another project.

Scrabble tile pendants are pretty popular-as are variations like glass tile pendants. To put my own twist on the whole scrabble and make it a bit more 'me' I thought I'd try using my own travel photos for the designs. I also did one using some Japanese paper scraps that I bought on etsy. Scrabble tile pendants are NOT for the impatient-they take days to make if you do them this way.

Day 1: Computers, cutting, and glue (oh my!)

First I had to crop photos to the right shape, and make tiny versions of the pictures I wanted to use. I used GIMP for that-good free software! I printed them on photo paper and cut them out with an x-acto knife.  

The size came out pretty close to the tiles; I might make them slightly bigger next time as I'm not sure I want the white border.


Next I glued the photos to the tiles with mod podge and waited them to dry before trimming the photos closer to the edges of the tiles. 


Then I 'sealed' the paper with more mod podge-covering the surface and cut edges of the photo and let them dry overnight. Oh yeah-I should mention that our power went out mid-way through this step and I had to finish by the light of a flashlight and candles!

Day 2: Resin time! 

This was the exciting part. I used Ice Resin which is a two-part epoxy meant for jewelry, it dries clear and is supposed to resist clouding over time. It also makes a dome shape by itself if you're careful. I mixed the two parts of resin carefully and began dripping resin onto the pendants. (I had to open the windows-it's a bit stinky once mixed!) As I kept dripping resin onto the pendants it naturally went to the edges and domed in the center-so far it seemed to working great-at least until I bumped some of the pendants and spilled it down the sides-boo!

Here is what the pendants looked like when coated in resin before I covered them up and left them to dry for 24 hours-no peeking or moving them, as you could ruin the dome! I covered them with a box top weighted down with some books to keep curious cat paws away!

They're already forming a dome, as you can see. This is only about 10 minutes after I finished putting the resin on. William the hippo plush snuck into this photo somehow . . . 


24 hours later I was finally able to take a look at the pendants! I think they worked out well, despite the spills. The doming effect seems to be intact from the side view. 


You can see the effects my bumping and spilling did have here. I'll have to try trimming or filing the excess resin off the side, because I really like the design on this one!

Now that the resin has dried, I think I'll try out some bail designs while I'm waiting for them to cure completely (this takes 3 days!) I think the hardest part of this is all the waiting. LOL I've bought some ready-made glue-on bails, but I'm determined to try making my own bails. I love hand-making as many bits as possible.

So, what do you think of my first attempt at these pendants? Has anyone else tried doing this? Please leave a comment and let me know!
Copyright 2011. See more at Voyage of the Hyperspace Hippo

Thursday, March 17, 2011

Semi-Handmade Scratching Post for Loooong Cats

Does your cat like scratching on vertical surfaces? Cats like to be able to stretch out fully when they scratch. Scratching is a basic need for cats, and the best way to keep your cats from scratching your furniture is to provide an alternative! There are a few types of materials used scratching surfaces and trial and error will determine what types your cat will use-our two resident rescue cats enjoy cardboard and carpet and will not scratch sisal. We have one really tall, long kitty who LOVES scratching the sides of chairs and even the corners of walls. He likes the cardboard scratching posts we have for him but they haven’t quite stopped him from scratching the walls. He reaches higher than any standalone scratching post I’ve ever seen. Only big (and expensive!) cat trees look like they’d really let him stretch as high as he likes to.  We’ve been thinking about making our own for a while now, and we’re still considering putting together a long cardboard one for them, but my fiancĂ© came up with this design for a vertical carpeted scratching post made from an old board,  a refill for a carpeted scratching post, and some nails. You could probably easily use ordinary carpet for this if you could find the right size or were willing to cut it up.  It’s really simple, anyone could make one!


We found a long flat board in our basement left behind by a previous tenant. My fiancĂ© tells me it is probably a 1 by 6 board. For the scratching surface, we got one of the refills for this scratching post at petco: http://www.petco.com/product/112680/Petmate-Lean-On-Me-Fashion-Scratch-Post.aspx It’s great for this purpose because it’s meant to go over both sides of that A-shaped holder so it’s LONG (A little over 3 feet). It has Velcro straps which we wrapped around the board. If you bought your own carpeting, you could easily customize the size and be able to wrap the sides and back of the board as well-I think we’ll do this next time.

We secured the carpet to the board with some short nails (short enough to lay flat in the front and not catch on kitty nails, but still not stick out the back).  If you’re willing (or your landlord wouldn’t mind) you could easily nail the board to a wall near one of your cat’s favorite scratching spots. The walls in our apartment don’t do well with nails (they tend to crumble) and we didn’t want to put nails into the front of the moulding where we wanted to place the scratching post (our cats favorite scratching corner!), so we put screw hooks in the back of the moulding and attached the board with string and rubber bands to make it easier to wrap tightly. We put one string at the top and bottom. You could always trim the board to the length of the carpeted part of the scratching post.


The hooks we used

The string on one side of the board


 The rubber band on the other side


Our long cat loves his new scratching post, and our shorter cat-who has always been very happy with the cardboard scratching posts-loves it too.


Above is one of our cats using the new scratching post, and to the right here's our looooong cat using the scratching post. Sorry for the low quality, but he just wouldn't cooperate when I was trying to get pictures but I managed to catch him on my phone! You can see even though he's not stretched all the way he reaches close to the top!
My cats seem pretty happy with their handmade toys. I’ve also made them a stuffed catnip sock and my fiancĂ© made them a box to play in with 2 doors and toys hanging down inside. (Of course we can't resist buying them presents sometimes-they have lots of toys!) Has anyone else tried making their own scratching post or cat furniture? What about cat or dog toys?  I’d love to hear about it. If you try this method out, I’d love to know if your cat likes it too!
One of our favorite toys-a fleece rope on a stick

Copyright 2011. See more at Voyage of the Hyperspace Hippo

Wednesday, March 2, 2011

Helpful Stuff-The Unofficial Etsy Forums


Any of you who are on Etsy may have noticed the big change in the Etsy forums recently. Basically they've taken away the sections where you could promote your shop or blog, the one where you could discuss various techniques or materials, the critiques section (where you could go to request feedback on your shop), and the general chat (called etc.) forum I used to use the first two often-the first to request people submit their etsy finds and the second to ask my own technique questions. I never really used the critiques or etc. forum but I'm sure lots of poeple found them useful!

Anyway, the point of all this is to let you all know that I've found an alternative (thanks to @Demure4You on twitter). It is called the Unofficial Etsy Forums and it was started by a group of etsy sellers who heard that the Etsy forums were to be changed and created their own separate forum that followed some of the old Etsy forum format. I think one of the coolest things about the new forum is that you DON'T have to be an Etsy person to use it! So if you have an Artfire shop, a Zibbet shop, or NO shop, you can come here and ask questions! Yay! I asked a materials question there for the first time and got an answer within 20 minutes, how great is that? So come and join me in the Unofficial Etsy Forums!

Copyright 2011. See more at Voyage of the Hyperspace Hippo

Thursday, February 17, 2011

Around the world in 80 beads-Seattle


I recently visited Seattle (ok, it was over a month ago and I’m just getting around to actually making this post . . . I admit it!) and found myself with a free day. What did I do? Well other than spending a little time in my favorite quirky Seattle neighborhood-Fremont-of course I went looking for bead shops! I was staying near the University of Washington and was easily able to visit both of these by bus. They were two totally different bead stores, each cool for a different reason!


Fusion Beads:
I thought this was a really professional-looking store. It’s really nicely set out and organized by type of bead. They did have some different beads than I normally find where I am, and they have a good selection of popular and useful materials- a variety of metal charms, Swarovski crystals and pearls in all sizes and colors (in fact I bought a whole bunch of them in fire opal and black diamond for a necklace I’ve been planning), cubic zirconia in a rainbow of colors, plus other supplies like resin and bezels, and just about anything else you might want for most common jewelry-making projects. I was most excited about the selection of charms, resin, and bezels as my nearest bead store at home doesn’t actually carry resin supplies, and has a pretty small selection of charms. The charms here were sorted by type and very easy to look through for what you wanted. The prices seemed pretty decent to me-not especially cheap, but definitely not more expensive than other places, either) and they also have an online store which is really convenient for future shopping!


I made the pair of earrings at right for my Etsy shop with some of my finds at Fusion beads. Find them in my etsy shop here


Gargoyle Beads:
After a stop at one of my favorite Seattle places-the Theo Chocolate Factory-I headed to Gargoyle beads in Fremont- it’s a small independent store that, according to their website, has been around since 1933 (but not always in Seattle)! It’s a bit hard to find but totally worth the effort! Was one of only a few shoppers in really rainy weather (I know, you’re thinking ‘it’s Seattle, of course it rained’ but it was raining much harder than is usual there!) The woman who was running the store that day was very friendly and enthusiastic about the shop (I can’t recall her name, unfortunately-sorry about that!)
She chatted with me about the selection of beads, the shop, the weather, and just whatever. She even let me put my soaking wet coat and backpack behind the counter so they could dry and to make my shopping easier. This place had a very unique selection and I got all sorts of beads there that I’ve not found elsewhere-I got a gargoyle (of course!), some pewter beads, two packages of adorable little handmade Indian glass butterflies, and a few interesting charms. They had a cool collection of different gargoyles, pewter beads in bulk, vintage glass and acrylic beads, stringing materials, and skulls galore! Above all I loved the friendly and small feeling of this store, and almost wish I lived in Seattle so I could visit more often! The only downside to this store, for me, is that they don’t have an online store so I can keep buying!


I'll leave you with one of my favorite quirky finds from Seattle's artsy neighborhood of Fremont: the huge Fremont troll, located under one of their big bridges! I definitely recommend checking out Fremont if you're ever visiting Seattle!

Please leave a comment and let me know what you thought of this post-Are store reviews interesting/useful to you? Have you been to either of these stores? Do you have a favorite local bead store or do you do all your buying online? Do you look for new bead stores when you travel, or is it just me? LOL

Copyright 2011. See more at Voyage of the Hyperspace Hippo

Thursday, February 10, 2011

Adventures in Crafting-Chai Bath Bombs

Hello readers! I made some fizzing chai bath bombs before the holidays and never got around to blogging about them, but they came out pretty well! I found the basic recipe for these in a book called Melt and Pour Soapmaking by Marie Browning that I borrowed from the library. It’s a pretty useful book, not just recipes but also some basic advice on how to make hand-milled soap, bath bombs, bubble bath, and other things too. I won’t reprint the actual recipe here as I don’t want to step on any toes-but there are tons of basic bath bomb recipes online that could give you the right proportions, or you could see if your library has this book!


In general, though, all the bath bomb recipes I’ve seen have a few things in common-citric acid and baking soda. These are what create the fizz when wet! Many recipes include some kind of salt (either purchase sea salt, bath salts, or simple epsom salts which was what I used) and some add cornstarch. Then they add something to give the bath bombs a scent-usually essential oils. Some also include food coloring or other colors. I chose not to use essential oils as they are generally toxic to cats (I have two, and they both lick water out of the bathtub) and I have heard that some people with sensitive skin react to some types. I also didn’t add any colors. The recipe I chose used simple spices for both scent and coloring. I was able to get all the ingredients I needed (including a tiny spritz bottle) from a local natural/health food store that has a bulk section so I was able to make up little baggies with just the amounts I needed. Obviously the epsom salt, baking soda, and spices can also be purchased at drug stores and grocery stores, but you might have more trouble finding the citric acid there.


First all the powdered ingredients are combined together and mixed. This particular recipe calls for citric acid, baking soda, and cornstarch. I didn’t use all the spices called for in the recipe-I only included cardamom, cinnamon and clove (all powdered)-I wasn’t able to find star anise, so again I left it out. mmm, spices!


Next you spritz the powdered ingredients VERY sparingly-enough to make them stick without activating the fizzing reaction. This is where I made the main modification to this recipe. I thought that it would add to the scent and color to use chai tea instead of water or witch hazel for the spritzing liquid. I made tea from a delicious loose leaf chai that I had on hand from a local tea store, and spritzed the bath bombs with that. To the left, you can see the spritz bottle I used and the tea I made. It smelled sooo good.


You have to be very careful not to let it get too wet-in my first batch the powder started sticking together before the mixture seemed damp to me and the ones in that batch ended up fizzing and expanding in the molds-not good! The second batch I stopped spritzing sooner, and it still packed into the molds nicely and held together when dry. Below you can see how the damp mixture looked before packing it into the molds


I found an ice cube tray to use for the mold. You have to pack the mixture down very tightly into the molds, I found that I could fit a lot more in there than it looked like at first! Most recipes say to let them dry in the molds for a few hours and then let them continue hardening on a cookie sheet overnight before using or wrapping to give away (some say a week).


It’s been a couple of months since I made them and the ones I have left have lost some of their scent, so my advice would be to use them as soon as possible! I still think they’d make a great gift, you just couldn’t make them too far ahead of time. I do wonder if adding the vanilla fragrance oil would’ve held the scent longer or made no difference.

Making homemade beauty products seems like a lot of fun to me. I’ve found a few recipes for body lotion and I’m planning to combine a few and try that out next! :o) Have you tried crafting soap or beauty products? Any good websites or books to recommend? Please comment and let me know what you think!

Copyright 2011. See more at Voyage of the Hyperspace Hippo


LinkWithin

Related Posts Plugin for WordPress, Blogger...