Showing posts with label scrabble. Show all posts

Friday, June 24, 2011

Triple Letter Score-Scrabble Tile Pendants Part 2-making bails!


I know you’ve all been anxiously awaiting this, so here is part two of my post on scrabble tile pendants! Once the resin had cured on the scrabble tiles, the next step was to add the bails (or, pendant-hanging thingers, as I would have called them a couple of years ago before I started making jewelry-I’ve learned a lot of new terminology!) There are a lot of pre-made glue-on bails available, mostly by Aanraku. But being me, I wanted to make my own bails from wire. I had some idea as to how it might be done, and I looked around online for examples to see if anyone else was doing something similar. I didn’t find any, and I started wondering if handmade bails would even work! Luckily I asked around to a few of my jewelry-making ‘tweeps’ on Twitter, one of whom has made her own bails in the past and she reassured me so I got started!


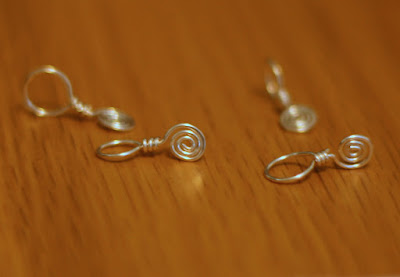
I made the bails themselves with 22 gauge half-hard wire.  I made a small wire spiral, and made a large wrapped loop on top. (That was especially exciting as I got a chance to use my new wire looping pliers!)  I’m sorry I don’t have any pictures during this part of the process-I got excited and made a whole bunch before I remembered I wanted to blog about this!


I hammered the spirals flat figuring that that would make a more surface area for the glue to adhere to.  I also hammered the loops to harden them.


I then sanded both the wire spirals and the backs of the scrabble tiles to make a rough surface for the glue to adhere to. 


Then I was ready to glue! After doing some reading online I’ve found that a lot of people use an adhesive called e-6000. I’ve heard mixed reviews of it, though, with some people saying that their creations fall apart using this glue! My friend Meredith of TilleyJewels suggested something called Crafter’s Goop, which I think I will try out next.  My fiancĂ© has a quick-drying two-part epoxy that he’s used for wire projects, so I tried that first because we already had it. You have to mix the two parts, then use it quickly before it begins drying.


Here is what the finished product looks like, both front and back. I’m pretty happy with how it looks, and just about ready to list them in my shop. The glue (and the results of my resin spills that I mentioned in the last post) are visible, but only on the backs of the pendants. My main concern with these was sturdiness-would the handmade bails stay on? A friend of mine has been wearing one of them and has had no problems so far. On top of that, when I was trying to take pictures of the pendants, I dropped a wooden board that I use as a background right on top of them, and the bails didn’t separate from the pendants. The adhesive wasn’t even fully cured at that point, so, I think they’re going to work pretty well!

As usual, thanks for reading, everyone! Please leave me a comment and let me know how you like the pendants. Would you buy one?

I was included in a treasury: City Life!

Wow! One of my scrabble tile pendants was included in this lovely 'City Life' treasury by Shroompers on etsy! Check it out!

Tuesday, April 12, 2011

Triple Word Score-Scrabble Tile Pendants

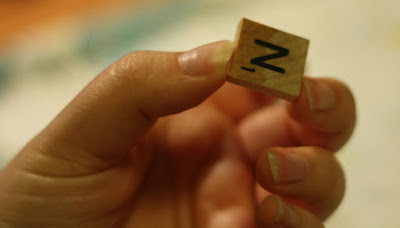
Hello readers! For the past few days I've been working on scrabble tile pendants. This is the first time I've tried working with resin and I'm having so much fun! I thought it'd be even more fun to share the process with you guys. I bought some individual scrabble tiles at a flea market (the Fremont Sunday Market) while I was visiting Seattle. I also got some other cool stuff while I was there-watch backs, old coins-but those will have to wait for another project.

Scrabble tile pendants are pretty popular-as are variations like glass tile pendants. To put my own twist on the whole scrabble and make it a bit more 'me' I thought I'd try using my own travel photos for the designs. I also did one using some Japanese paper scraps that I bought on etsy. Scrabble tile pendants are NOT for the impatient-they take days to make if you do them this way.

Day 1: Computers, cutting, and glue (oh my!)

First I had to crop photos to the right shape, and make tiny versions of the pictures I wanted to use. I used GIMP for that-good free software! I printed them on photo paper and cut them out with an x-acto knife.  

The size came out pretty close to the tiles; I might make them slightly bigger next time as I'm not sure I want the white border.


Next I glued the photos to the tiles with mod podge and waited them to dry before trimming the photos closer to the edges of the tiles. 


Then I 'sealed' the paper with more mod podge-covering the surface and cut edges of the photo and let them dry overnight. Oh yeah-I should mention that our power went out mid-way through this step and I had to finish by the light of a flashlight and candles!

Day 2: Resin time! 

This was the exciting part. I used Ice Resin which is a two-part epoxy meant for jewelry, it dries clear and is supposed to resist clouding over time. It also makes a dome shape by itself if you're careful. I mixed the two parts of resin carefully and began dripping resin onto the pendants. (I had to open the windows-it's a bit stinky once mixed!) As I kept dripping resin onto the pendants it naturally went to the edges and domed in the center-so far it seemed to working great-at least until I bumped some of the pendants and spilled it down the sides-boo!

Here is what the pendants looked like when coated in resin before I covered them up and left them to dry for 24 hours-no peeking or moving them, as you could ruin the dome! I covered them with a box top weighted down with some books to keep curious cat paws away!

They're already forming a dome, as you can see. This is only about 10 minutes after I finished putting the resin on. William the hippo plush snuck into this photo somehow . . . 


24 hours later I was finally able to take a look at the pendants! I think they worked out well, despite the spills. The doming effect seems to be intact from the side view. 


You can see the effects my bumping and spilling did have here. I'll have to try trimming or filing the excess resin off the side, because I really like the design on this one!

Now that the resin has dried, I think I'll try out some bail designs while I'm waiting for them to cure completely (this takes 3 days!) I think the hardest part of this is all the waiting. LOL I've bought some ready-made glue-on bails, but I'm determined to try making my own bails. I love hand-making as many bits as possible.

So, what do you think of my first attempt at these pendants? Has anyone else tried doing this? Please leave a comment and let me know!

Copyright 2011. See more at Voyage of the Hyperspace Hippo

LinkWithin

Related Posts Plugin for WordPress, Blogger...